Skip to Content

category

Category: Recipes

post

Raw mint chocolate brownies

I so appreciate all the congrats from you guys regarding the impending arrival of our little spawn. I am due next week and officially in “get all the things done!” mode.

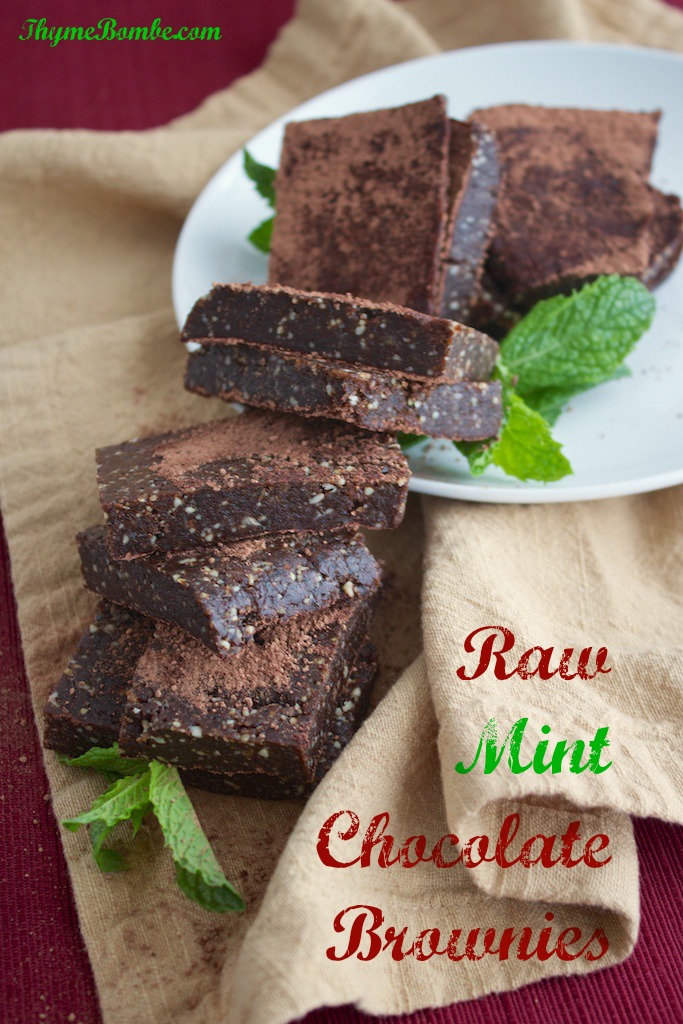
I’ve heard over and over again the same advice to stock your house full of foods that are easy to eat one-handed for after baby’s born and you’re carrying him/her around everywhere all the time to keep ’em from screaming continuously. To that end, I decided to make some healthy raw-ish mint chocolate brownies to stuff in my face as needed. I say raw-ish because I didn’t personally bother to use raw cacao powder or raw flavor extracts in these, but you absolutely could if that’s important to you, it just wasn’t for me. To me, this is raw enough.

Raw mint chocolate brownies

In fact, I’m letting a lot of things slide lately. Sometimes the dishes don’t get done, and that’s ok. Sometimes I get winded just making the bed and so I just stop half way through. Sometimes the thought of shopping for food makes me want to collapse into tears over a pint of ice cream, so I don’t go and we order out for the 3rd time in a week. Sometimes… my perfectly plated stack of raw mint chocolate brownies topples over before I even get my first shot in, and with a sigh, I decide to just go with it rather than re-plating because it’s a real and accurate depiction of how I’m feeling right now.

“Oh no! That one broke in half! I’ll have to eat it since I can’t possibly photograph it like that.” (Totally happened)

Raw mint chocolate brownies

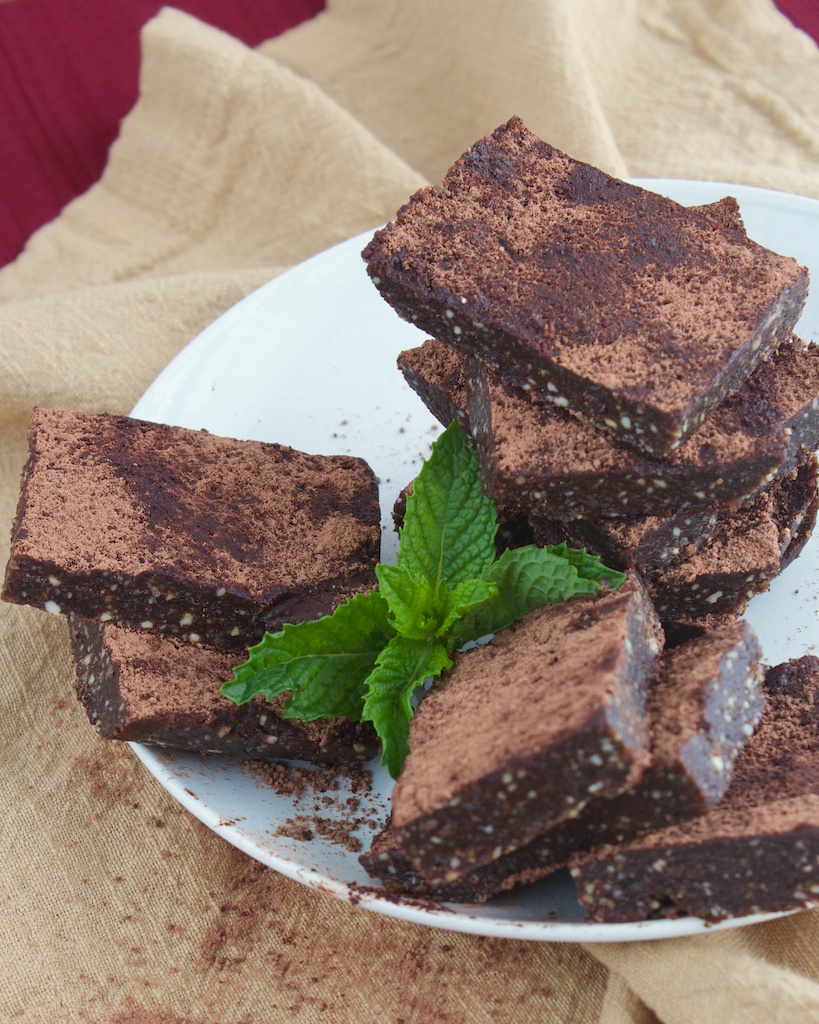
They may look a bit beat up, but I assure you these brownies were just as tasty after their tumble. They have a high moisture content, giving them a truly fudgey and rich texture. The mint flavor is subtle, herbal, and cuts through the richness nicely.

Raw mint chocolate brownies

A no-bake and guilt-free chocolatey brownie with a hint of fresh mint.

Prep Time: 15 minutes

Total Time: 15 minutes

Yield: Makes 12

Ingredients

  • 1 cup raw unsalted cashews
  • 1/2 cup raw unsalted macadamia nuts
  • 1/2 cup raw unsalted walnuts
  • 1 cup chopped dates
  • 2 cups fresh mint leaves (tightly packed)
  • 1/4 cup unsweetened cocoa powder (+ more for dusting)
  • 2 tsp. chocolate extract
  • 1 tsp. raw agave nectar
  • pinch of salt

Cooking Directions

  1. In a food processor, process nuts until small. Add dates and pulse to combine.
  2. Add all other ingredients and process until a paste forms and starts to pull away from the sides.
  3. Press mixture evenly into a 9x9 pan lined with plastic wrap or wax paper.
  4. Dust over extra cocoa powder and freeze for at least an hour.
  5. Store in an air-tight container in the refrigerator or freezer.

If you would prefer a stronger mint flavor, simply substitute one of the teaspoons of chocolate extract for a mint extract instead. Also, vanilla will be fine if you can’t find chocolate extract too. And if you don’t have one of those nut varieties, just sub in more of one of the others. I like to use macadamias in raw desserts that imitate something that is typically baked because they lend a convincing buttery flavor and texture. I chose walnuts because they tend to deepen chocolate flavors. If all you have is cashews though, it’ll be fine.

Raw mint chocolate brownies

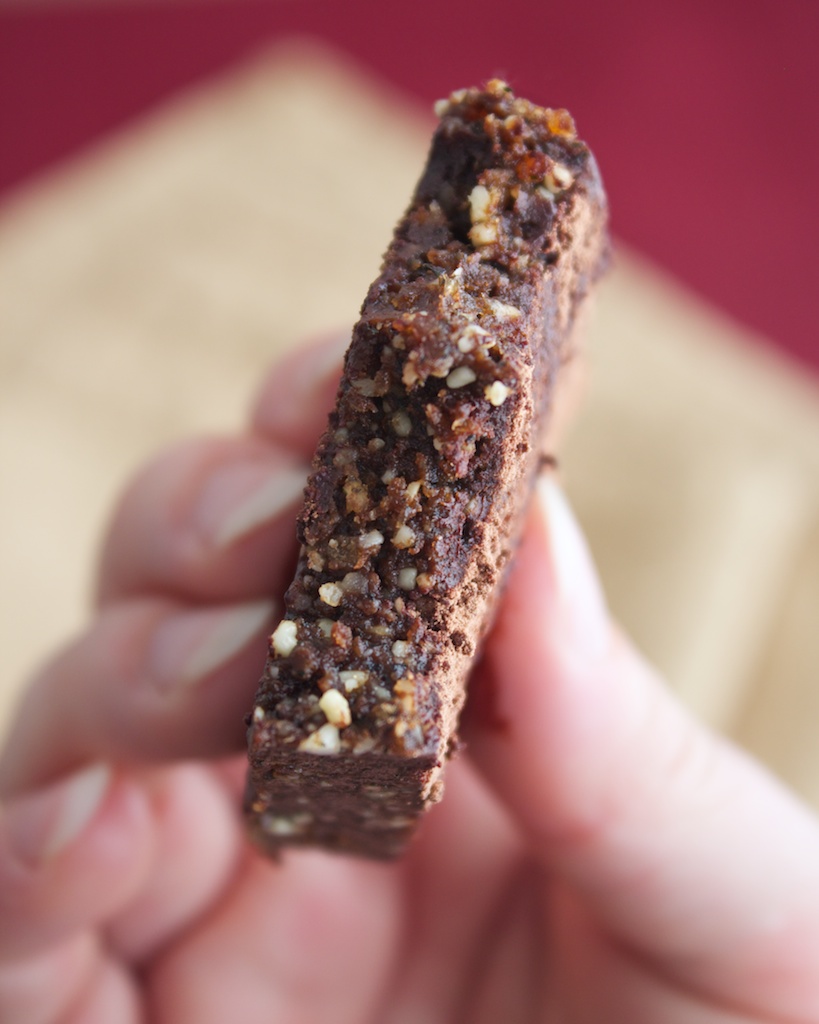
I personally like to store these in the freezer and eat them ice cold. They can be messy and melty at room temperature, and the cold makes the mint flavor pop in a cooling and refreshing way. These will be great to hold me over while the little lady is eating her breakfast, and when she’s done I can worry about making something more substantial to eat.

It’s gotten to the point now where I’m on edge all day expecting labor to start at any moment. On that note, I should probably go pack for the hospital, or clean, or draft a living will or something…


post

Sriracha hummus

If you don’t already know, I suppose now is as good a time as any to mention that my husband and I are approximately 3 weeks away from the birth of our first child. I’m due with a little lady on July 18th and totally freaking out.

A few weekends ago, I hosted a little dinner party at our house in an effort to have one last hurrah with some of our friends before we inevitably disappear down the rabbit hole of new parenthood. I cannot believe I managed to pull it off. I’m massively, uncomfortably, achingly, exhaustingly, deliriously pregnant right now and for some reason thought it was a good idea to cook a fancy dinner for 8 people, the most I’ve ever entertained. Somehow, by spacing the prep work out over a few days and by the gracious help of my wonderful husband, it all managed to come together and everything tasted great. And as a bonus, I actually had the energy to enjoy myself that night rather than collapsing into spontaneous hibernation. Domestic goddess status: Achieved.

Sriracha hummus

The menu for the night included a honey soy roast beef shoulder (this recipe can be found in my book,) mashed potatoes, jasmine rice, Thai chickpea and cauliflower curry, baked leek and shiitake wontons, a salad with strawberries, bleu cheese, and pistachio dust, and a dark chocolate berry crumble with whipped coconut cream. I wondered what the guests would like the most, and while of course everyone swooned over dessert, I was surprised to find that by the end of the night the only dish that completely disappeared was an appetizer plate of sriracha hummus with veggies that took me almost no time to put together.

It would seem that it’s always the simplest things that make the biggest impact.

Sriracha hummus

This was a total experiment gone right. I just tossed a bunch of stuff in the food processor and hoped for the best. What I got was far better than just edible, it was downright delicious.

The flavor starts off a bit lemony but otherwise not too unlike a standard hummus, and then it hits you. A deep spicy tickle starts in the back of your throat and quickly rushes forward lighting up all of your tastebuds like thousands of fiery torches. It’s a tingly heat that makes your pupils dilate and little beads of sweat settle on your upper lip. Now that’s my kind of party.

Sriracha hummus

A spicy dip made with fruity sriracha and creamy chickpeas.

Prep Time: 15 minutes

Total Time: 15 minutes

Ingredients

  • 1 15oz. can of chickpeas (drained)
  • 3 tbsp. sriracha sauce
  • 3 tbsp. tahini
  • 3 tsp. lemon juice
  • 1/2 tsp. garlic powder
  • a heavy pinch of salt
  • 4 tsp. canola oil
  • 1 tbsp. + water (optional)

Cooking Directions

  1. Add all ingredients except for oil and water to a food processor and pulse to combine. Use a spatula to scrape down the sides and pulse a few more times.
  2. While processor is running, pour in oil through the vent in the lid. Process until smooth.
  3. If hummus is too thick, add water 1 tbsp. at a time until desired consistency is achieved.
  4. Store leftovers in an air-tight container in the refrigerator for up to a week.

I used water in this recipe to thin the hummus out to the right consistency, but if you’d prefer you can use the salted water from the can of chickpeas instead, just make sure to scale back the amount of salt you add until you’ve tasted it.

This was so good tempered with the coolness of cucumbers, but you can use pita chips if you prefer. If you’re a crazy person, try eating it with peppers. Go on, I dare ya.

Sriracha hummus

Supposedly spicy food helps to jumpstart labor. If that’s true, then I may have this batch of sriracha hummus to thank for introducing me to my daughter soon. If nothing else, maybe it’ll help the little lady to develop a taste for spicy food before she’s even born. I sure hope so, I may actually cry if I have to start toning down the heat for family dinners in the future. Mama needs her hot sauce!

Do you like super spicy food?


post

Strawberry sushi

I’ve been entertaining the idea of this recipe in my head for ages. Long before berry season I dreamed of these little bite-sized treats and couldn’t wait for my favorite fruit to ripen so that I could make these over and over throughout the warmer months. Strawberries have been tasting sweet and ripe for a few weeks now, but for some reason I’ve had a really hard time getting myself to finally make this recipe that I so longed for all winter.

Strawberry Sushi

What it took was a visit from a far-flung friend. Hannah of Wayfaring Chocolate has been staying with me for the Atlanta leg of an epic travel adventure/ global slumber party that she’s about 10 months into now. It has been so much fun to spend time with someone that before only existed in pictures and writing. Blogging is so wonderful in that it has allowed me to create many such friendships with kindred spirits I might never have had the chance to meet in “real life” otherwise. And now that she’s in my house, I must look productive! Cook all the things!

Strawberry Sushi

We both enjoyed sampling these sweet little strawberry sushi. The rice is just lightly sweetened with sugar and zinged up with the subtle tartness of fresh lemon juice and zest. The texture of the thinly sliced strawberry on top is strangely but appropriately reminiscent of fresh sushi-grade fish – firm but giving way to softness and a burst of bright flavor.

Strawberry sushi

A simple to make sushi featuring fresh strawberries pressed into balls of lightly sweetened sushi rice.

Prep Time: 15 minutes

Cook Time: 25 minutes

Total Time: 40 minutes

Yield: Makes 12 to 14

Ingredients

  • 1/2 cup short grain rice (sushi rice)
  • the zest of one lemon
  • 1 tsp. lemon juice
  • 1 tsp. sugar
  • 5 or 6 medium-sized strawberries
  • black sesame seeds for garnish if desired

Cooking Directions

  1. Prepare the rice: Rinse rice under cool water until water runs clear. If using a rice cooker, follow the instructions for making one cup of rice using the provided measuring cup.
  2. For stovetop rice: Rinse 1/2 cup of rice and bring to a boil with 3/4 cup of water in a medium sauce pot. As soon as water boils, turn heat down to lowest setting and place the lid on the pot. Allow rice to cook on lowest setting for 10 minutes, then turn off the heat and allow to continue steaming for an additional 10 minutes. Do not remove lid at any time during cooking or steaming.
  3. Transfer rice to a dish and fluff it with a rice paddle or spatula using cutting and folding motions.
  4. Add zest, juice, and sugar and incorporate using the same cutting and folding motions.
  5. Slice strawberries into thin slices. Place a slice in the center of a sheet of plastic wrap and top with a small ball of rice. It helps to dip your hands in water before handling the rice to keep it from sticking as much.
  6. Pull the plastic wrap up around the ball of rice and twist to form a tightly packed ball. Repeat until all the rice is used.
  7. Brush the top of each strawberry with a lemon wedge and sprinkle over sesame seeds to garnish.

These sushi are extremely easy to make. They are made in the temari-zushi style where all the ingredients are compacted into a little ball shape that is meant to resemble an object of Japanese folk art. A temari is a toy ball covered in ornate patterns of colorful thread and sometimes scraps of luxurious kimono fabric. These days, this intricately crafted object is much more art than toy – a collectible piece made by talented artisans while the toy versions are mass produced out of less expensive materials.

Strawberry Sushi

I use the plastic wrap method to make them. Just lay down a square of plastic wrap, place a slice of strawberry (or whatever topping you’re in the mood for) in the center of the plastic, add a small handful of rice, and then twist the plastic wrap up around it to compact the whole thing together. You can use as much or as little rice as you prefer. It helps to keep them bite-sized so that you can pop the whole thing in your mouth in one bite and not have to worry about them falling apart upon biting into them. If you make it too big, just pinch off a bit of rice and twist the temari back together again.

Strawberry Sushi

Hannah and I both loved these, and I was inspired to try out another long-dreamed-about recipe with her yesterday which also turned out delicious but needs a bit of tweaking before I can debut it here. Her visit is coming to an end soon (sadness!) but we’ve managed to cram in tons of great food memories that I’ll share with you soon too. Making food with friends is so much more fun!

Have you ever made sushi at home?

What flavor dessert sushi would you make?


1 2 3 4 5 6 7 8 9 10 ... 28 29   Next Page »