Now we get down to the really technical stuff.
When I started taking photos for The Japanese Pantry, I knew jack-all about photo editing. I had played around with a few of the settings in iPhoto before and could occasionally sort of guess my way into editing a photo well enough, but I really was just eyeballing it, not applying any actual knowledge.
Becoming a better photo editor took nothing more than investing my time to learn how to do it – reading articles, watching YouTube videos, and fiddling with the software until something just “clicked” in my head. I’m not going to go into how to edit photos because that’s a whole book worth of knowledge on it’s own and really just something that takes practice. What I do want to talk about is the strengths and limitations of the few pieces of photo editing software I used, and what I would have done differently if I knew then what I know now.
I work on an iMac, so the default piece of photo editing software I have is iPhoto. iPhoto is great for storing and sorting casual family photos, and it does offer some basic editing functions that can clean up an imperfect photo in a pinch. I was really happy with it before I started writing the book, it had plenty of functionality for touching up my random photos of salads and cats for the blog. Once I started trying to use it to edit photos to a more professional standard though, I immediately ran into some issues that I knew could not be overlooked.
Here are the two main problems I found with iPhoto that would eventually drive me to upgrade my software: 1) You cannot “spot edit”, meaning that any adjustments you make will apply to the whole photo rather than just the part that needs adjusting, and 2) The batch editing function is severely impaired. Editing a batch of similar photos would require you to make the same adjustments to each photo individually rather than applying them across a spectrum of nearly identical photos to save time. iPhoto has a batch editing function, but it never worked properly for me for batch editing more than 2 files at a time, so it might as well have not existed.
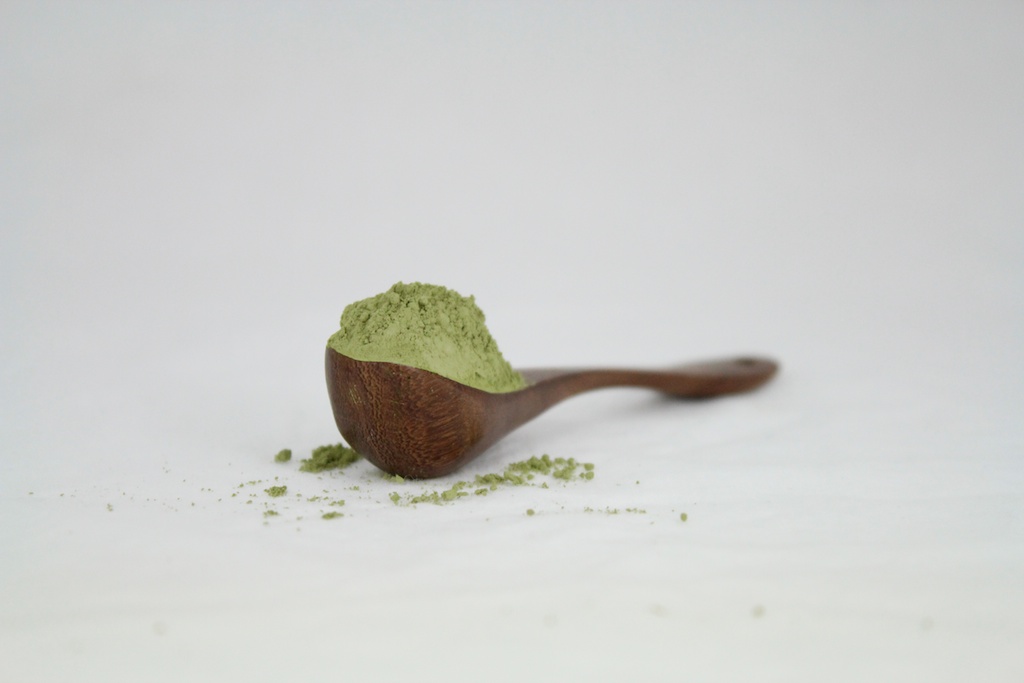
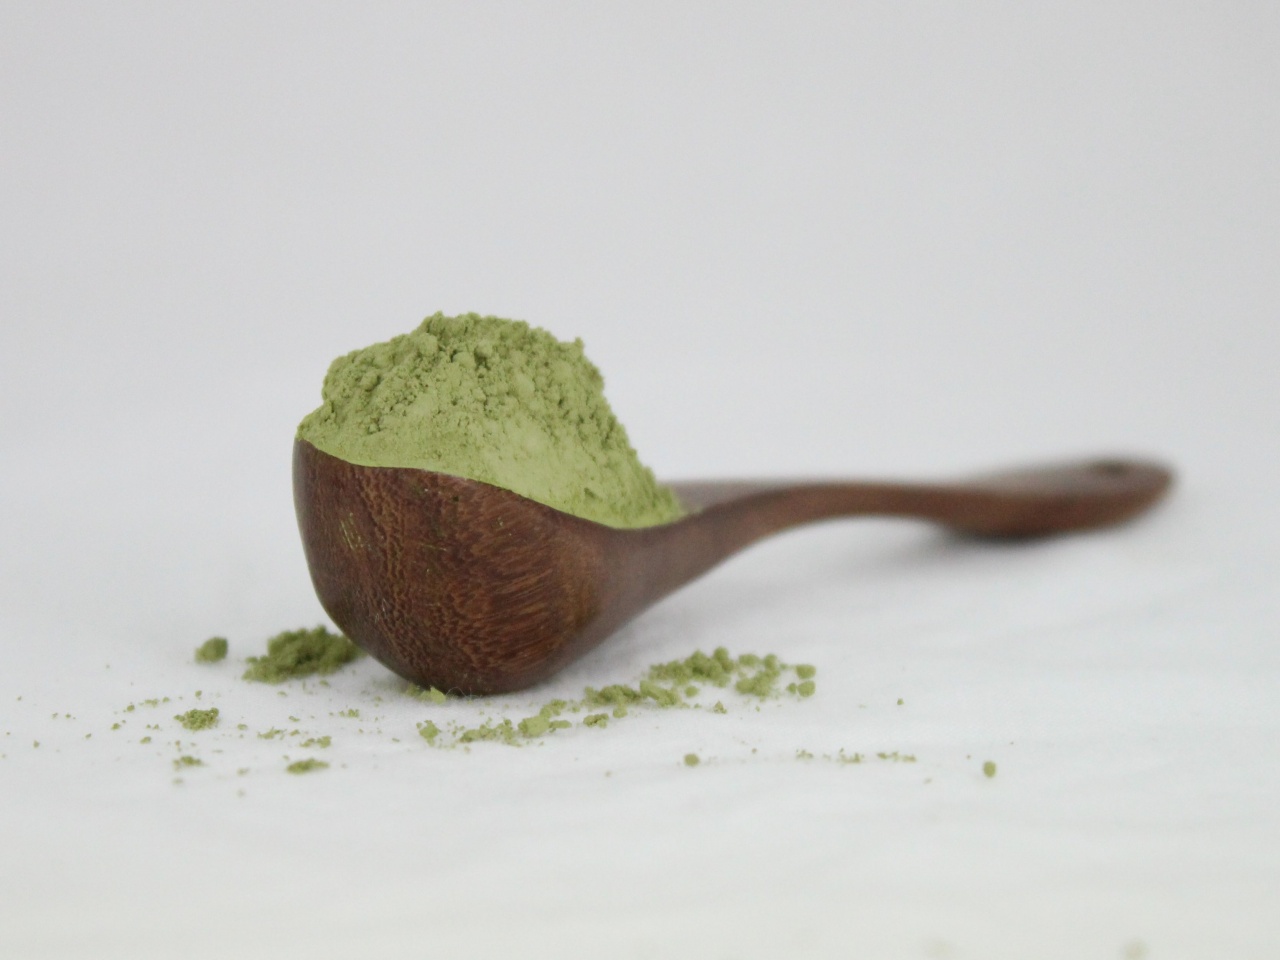
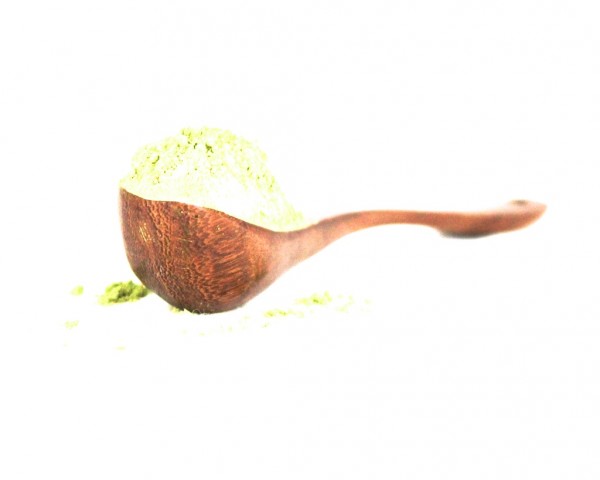
In these first 3 photo examples, all of the same shot of matcha green tea, you can see the results of the first problem I mentioned in action. The first photo is the original photo completely unedited in any way. The second photo has been cropped as well as sharpened, and the third has been adjusted for exposure and white balance. The third photo represents the very best I was able to do with iPhoto.
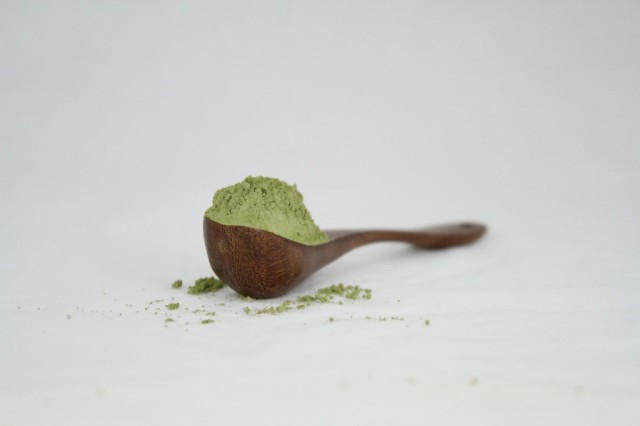


As you can see in the second and third photos, my edits applied to the whole photo rather than just the parts that needed adjusting. Sharpening brought the front of the spoon into greater focus, but at the expense of highlighting some imperfections, such as the texture and bits of fuzz on the white backdrop and some scratches on the front of the spoon. Cranking up the exposure helped to bring the background closer to true white, but it washed out the color of the matcha. Adjusting white balance could only do so much – there is still a faint blue cast to the background, but removing it skews the entire picture too warm. This was the best it could get.
I spent some time researching professional editing software trying to figure out what was going to give me the most bang for my buck. After much deliberation, I decided on Aperture.
Aperture is another Apple product that I knew I could move seamlessly into from iPhoto. I also looked into Lightroom and Photoshop, but in the end I decided that they were both a bit too expensive for a novice who didn’t even know what she needed yet. At $80, Aperture was just right for trying out some real professional software without the risk of over-investing.
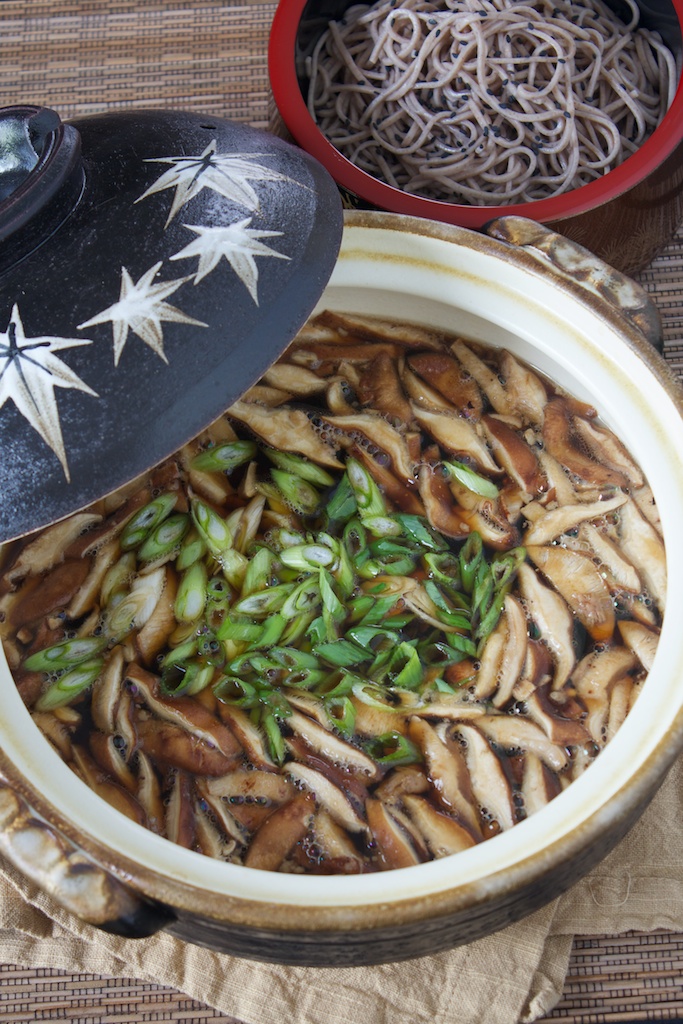
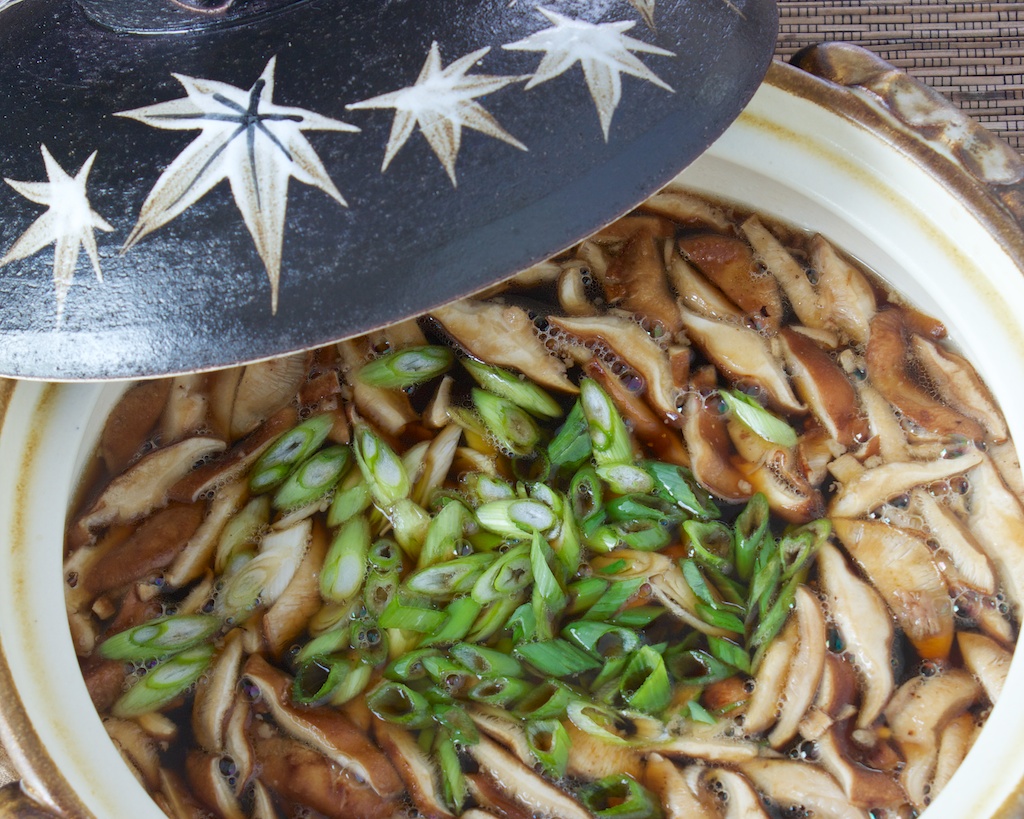
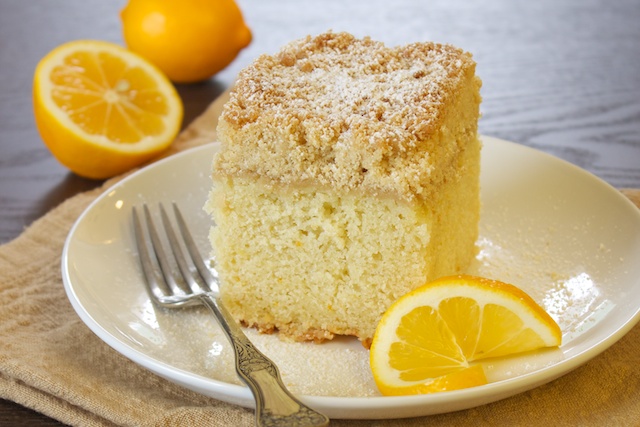
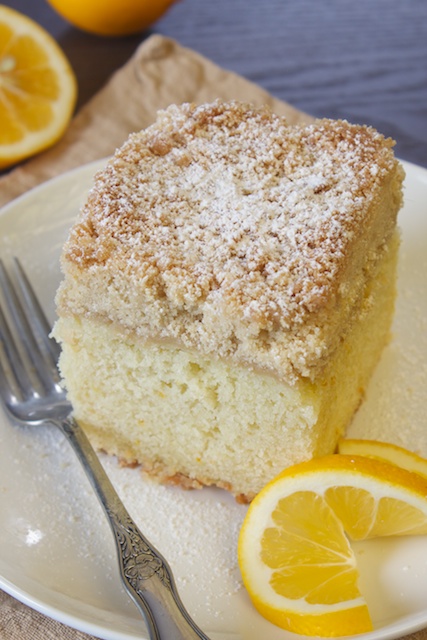
Right off the bat there was lots of new functionality to get familiar with. Like all Apple products, Aperture was intuitive to use, I could just dive right in with trying new things and not worry that I was doing something wrong that couldn’t be undone. Aperture seemed to solve all the problems I had with iPhoto – I could spot adjust, batch edit, more accurately correct white balance, retouch more seamlessly, “turn off” an edit I’d made to compare it with the original quickly, and so much more that I didn’t even realize I needed until I had it. Just look at how much brighter and more vibrant this cleaned up photo looks after editing with Aperture…

That’s the photo that made it into The Japanese Pantry, and on the whole I’m pretty pleased with it.
There was just one thing that Aperture couldn’t do that I realized was going to be a deal breaker if I couldn’t figure out some way around it… Aperture does not support layering. I did not realize this until I’d already purchased it and nearly cried my eyes out thinking I’d just wasted my money on a piece of software that would always be lacking.
If you’ve never used layering before, here’s the jist. Layering allows you to take a part of an image and make it into its own editable layer. Imagine a stack of 3 pieces of transparent paper: The top layer is a picture of a bird, the middle is a mountain, and the bottom is the clear blue sky. You could easily drag the image of the bird to another part of the sky, take out the mountains layer entirely, or replace the blue sky with a picture of clouds, simply by interacting with a single layer at a time. Layering allows you to move, edit, omit, or replace parts of an image like a digital scrapbook.
For my matcha image, I needed to either remove or replace the background which was still not white enough even after editing with Aperture. I searched around and found a plug-in that would work with Aperture to allow me to do just that. Perfect Layers by OnOne Software was just the ticket.
With Perfect Layers, I can combine the best parts of 2 or more images to make one perfect picture. To use, you just highlight the photos you want to work with in Aperture and right click on “Edit with Plug-in”, then select Perfect Layers. Perfect Layers automatically opens and loads the images for you to work with.
For my matcha photo, I first tried “painting out” all of the background with Perfect Layers, but I found that it left really hard edges around the shadow underneath the spoon, making it look fake. I wanted to keep the shadow, but make the background really white, so I decided it might work better to make a version of the matcha image with the exposure completely blown out to get a bright white background that I could more easily blend around the shadows in the original image. This is the image with the exposure cranked up to the max…
 This technique worked perfectly. I was able to either paint in the white background or paint out the matcha subject where needed to get one unified image. The only complaint I have about Perfect Layers is that it does not have “smart edges,” meaning that the software has no ability to detect and trace around the edges of an object for you. For every image, I was tediously painting out the dark background being extra careful to get as close to the subject as possible without touching it. This was really hard to do with just a mouse and I ended up having to make tons of corrections to little areas where I’d “colored outside the lines.” This could easily be remedied by using a Wacom tablet or other digital stylus for more fine control, and honestly, the version of Perfect Layers I was using was free, so I really can’t complain too much.
Now that the book is finished and I’m back to photographing recipes for the blog, I’m more aware of exactly what it is I need in photo editing software. Using Aperture with Perfect Layers was a good first start into understanding and using professional photo editing software, and if I did not have more books planned in the future it would be fine for editing my random recipe creations. Since I do though, I think I’ll be looking into Lightroom and Photoshop again, possibly on a subscription basis to reduce the cost and get software updates for free.
If you’re on a Mac and considering upgrading to Aperture from iPhoto, I would say that it’s absolutely worth it if you don’t foresee yourself ever needing the layering function. Aperture really does have a great workflow, uncluttered look, intuitive controls, and much higher level of editing power than iPhoto. There were only a few functions in Aperture that I couldn’t figure out how to use myself, but a look around YouTube produced enough tutorials to familiarize myself quickly. If, however, you’re fascinated by the idea of moving around parts of an image like a scrapbook and making artistic changes to photos that are outside the realm of typical editing, you’re going to need a platform that supports layering, and Aperture with Perfect Layers isn’t quite enough. There is a paid version of Perfect Layers from OnOne Software that would completely supplement the layering function, but if you’re trying to get into professional photography you’re going to find using a plug-in product clunky and annoying pretty quickly.
That was a long, long post. I know this is completely boring to those of you who read this blog for the recipes, but I’m hoping that someone will find this helpful since I wish I had known all this stuff before I starting writing my book. Would have saved me so much time.
In the last installment of this series, I’ll talk about the book layout software I used. Yes guys, I designed and laid out my book by myself. When you self-publish, there’s no one to do that for you! (Recalling an entire day I spent trying to find the perfect calligraphic Japanese kanji font.)
Part 1: Getting Serious
Part 2: Anthologize and CreateSpace
Part 3: Photography Skills